
EMBRYOLOGY AND IVF LABORATORY SCIENCE
A clear guide to the equipment, alignment, pressure control, environmental checks and quality safeguards behind ART micromanipulation.
| ARTICLE INFORMATION | |
| Learning level | Beginner |
| Major category | Embryology and IVF Laboratory Science |
| Subcategory | Micromanipulation and Embryo Biopsy |
| Estimated reading time | 14 minutes |
| Author | Manoj Kumar K |
| Publisher | Inside Embryo by Aurion |
| Publication date | 8 August 2026 |
| Last reviewed | 8 August 2026 |
EDUCATIONAL AND MEDICAL DISCLAIMER: This beginner article is for education only. It is not a clinical operating procedure, a substitute for equipment instructions, a laboratory’s validated standard operating procedures or competency assessment, or patient-specific medical advice. Clinical micromanipulation must be performed by authorised, trained personnel within applicable quality, regulatory and witnessing systems.
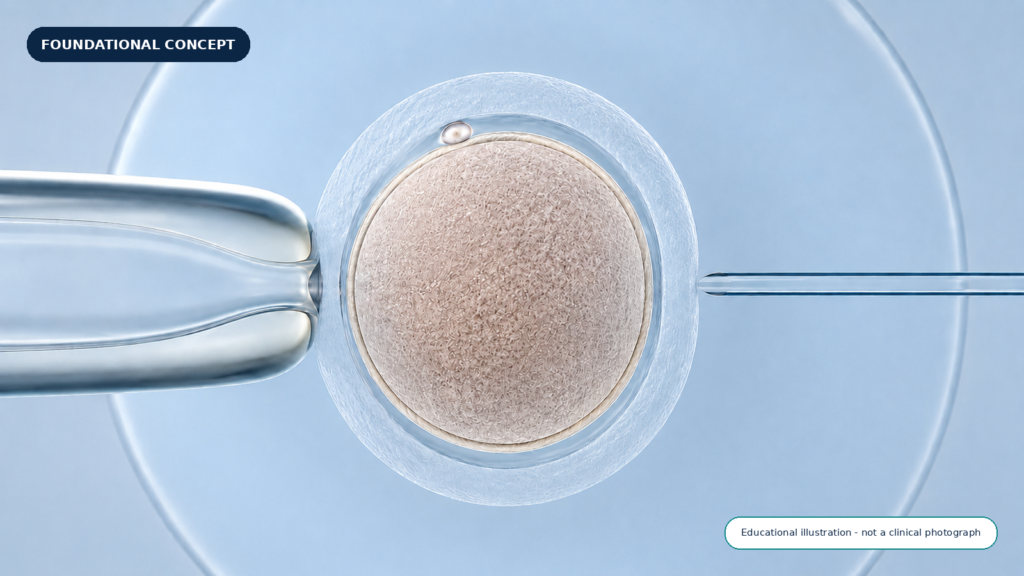
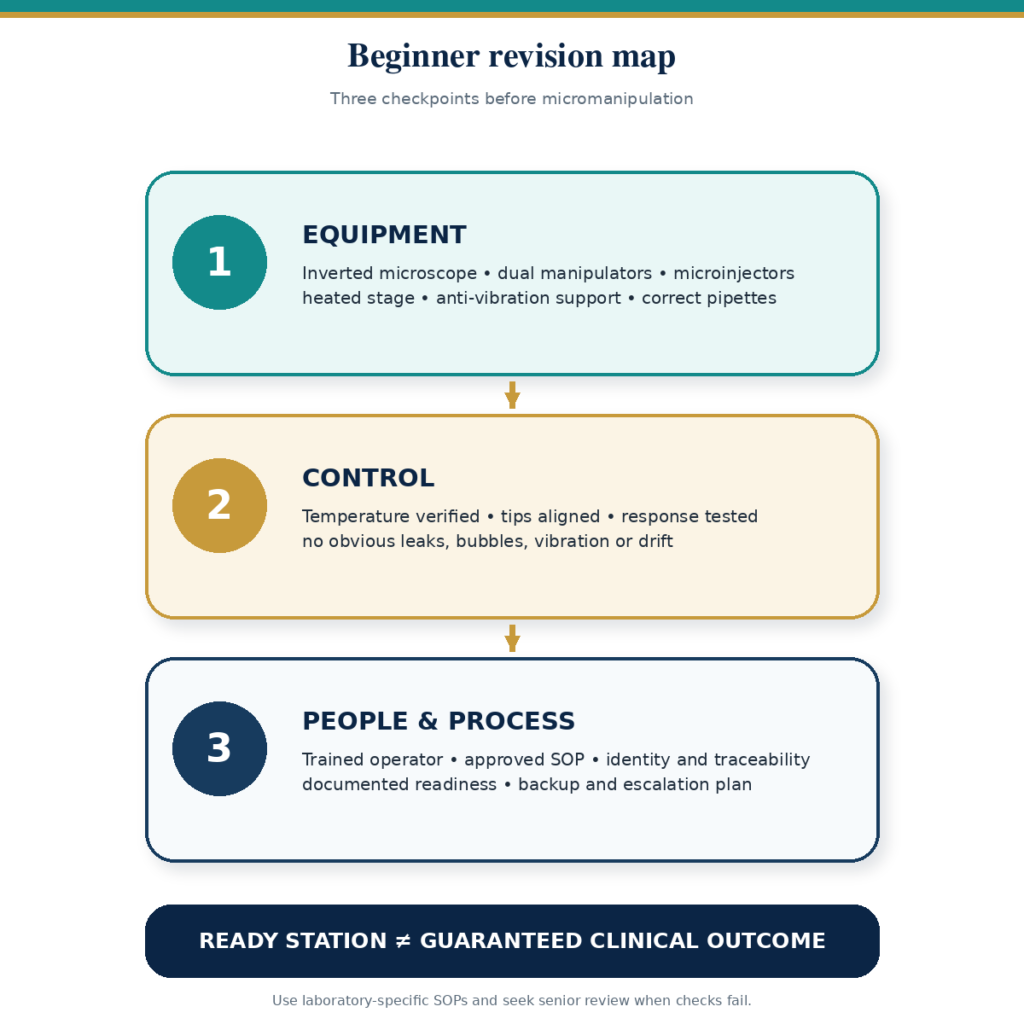
Micromanipulator setup is the controlled preparation of the microscope, manipulators, microinjectors, heating system, pipettes and work environment used to handle sperm, oocytes or embryos at microscopic scale. In assisted reproductive technology (ART), this workstation supports procedures such as intracytoplasmic sperm injection (ICSI), assisted hatching and embryo biopsy. ESHRE describes a typical biopsy setup as an inverted microscope with a heated stage, three-dimensional micromanipulators and microinjectors on anti-vibration support.[1,2] A technically ready station can reduce avoidable variation, but it cannot prove that an oocyte will fertilise or that an embryo will implant. This guide explains the system, a safe readiness sequence and the limits of what setup checks can demonstrate. It does not teach independent clinical operation.
What You Will Learn
- What micromanipulation and micromanipulator setup mean in ART.
- How the microscope, manipulators, microinjectors, heated stage and pipettes work together.
- Where station setup fits before ICSI, assisted hatching or embryo biopsy.
- A safe, laboratory-level sequence for checking alignment, pressure response and environmental control.
- Which technical and human factors can influence reliability.
- Why equipment readiness is different from diagnosis, prediction or a guaranteed clinical outcome.
Key Takeaways
| KEY TAKEAWAYS |
| A micromanipulator setup is a coordinated workstation, not one instrument.Alignment, pressure response, temperature control and mechanical stability work together.Functional checks should be completed with approved test material or acellular droplets before clinical use.Only trained, competency-assessed staff should perform or release clinical micromanipulation work.A ready station supports consistency; it cannot guarantee fertilisation, pregnancy or live birth. |
Table of Contents
Meaning and Basic Definition
The international ART glossary defines micromanipulation as a micro-operative technique performed on sperm, an oocyte or an embryo; examples include ICSI, assisted hatching, polar body biopsy and embryo biopsy for preimplantation genetic testing (PGT).[3] The micromanipulator moves a fine glass pipette in three dimensions. A separate microinjector controls aspiration, holding pressure or fluid expulsion. Setup means bringing this whole station into a documented, stable and responsive condition before use. It is therefore broader than switching on an ‘ICSI machine’.
Why Micromanipulator Setup Matters
Micromanipulation works at micrometre scale, so small problems can become important: a loose holder may drift, a bubble may delay pressure transmission, or an unverified stage may expose cells to unsuitable conditions. Current ESHRE recommendations call for critical equipment to be qualified, validated, maintained and monitored within accepted ranges.[1] Equipment quality and operator skill are both relevant to reliable performance.[4,5] Good setup limits avoidable technical variation; it does not remove biological variation between gametes, embryos or patients.
Evidence, Practice and Uncertainty
Established knowledge: precision movement, a stable optical plane and controlled pressure are core technical functions. Recommended practice: ESHRE calls for critical equipment qualification, validation, maintenance, monitoring and documented staff competence; the local SOP defines exact acceptance ranges.[1,2]
Common laboratory practice uses an inverted microscope, heated stage, opposed manipulators, microinjectors and anti-vibration support, although configurations differ. Electronic controls and digital imaging continue to evolve, but evidence does not establish one interface as universally superior. Expert interpretation is required for deviations, and it remains uncertain how much a single setup variable affects an individual clinical outcome.[4,5,8]
Where It Fits within ART and IVF Care
A treatment team first determines whether a micromanipulation procedure is clinically and legally appropriate. Laboratory staff then prepare identified gametes or embryos, media, dishes and the workstation. Setup checks occur before clinical manipulation; the procedure is followed by washing, culture, assessment and documented review. For embryo biopsy, the same core station may require a stage-specific biopsy pipette and a validated laser system.[2]
Station readiness must not be confused with treatment indication. ASRM’s 2026 opinion does not recommend routine ICSI for several non-male-factor indications because improved live-birth outcomes have not been demonstrated.[7] WHO semen reference distributions also support interpretation rather than a rigid fertile-versus-infertile division, and semen analysis alone does not determine an individual’s fertility or a treatment plan.[9]
Principal Components of the Workstation
A clinical station is assembled and validated for the procedures a laboratory performs. Brands and control systems differ, so manufacturer instructions and the laboratory SOP take priority over generic settings.[1,4]
Table 1. Core workstation components and their functions.
| Component | Simple role | Beginner-level readiness question |
| Inverted microscope | Views cells from below and provides suitable contrast and working space. | Are the optics clean, focused and configured for the approved procedure? |
| Dual micromanipulators | Move the holding and working pipettes in X, Y and Z axes with coarse and fine control. | Do both sides move smoothly without obvious drift or collision risk? |
| Microinjectors | Create controlled negative or positive pressure; systems may use air, oil or another hydraulic design. | Is response smooth, predictable and free from obvious leaks or bubbles? |
| Heated stage | Maintains the validated temperature around the manipulation dish. | Has temperature been verified at the relevant working position? |
| Anti-vibration support | Reduces movement from the bench, building and nearby equipment. | Does the field remain stable during normal operation? |
| Pipettes and holders | Secure procedure-specific holding, injection or biopsy micropipettes. | Are the correct, intact tools mounted securely and at a safe angle? |
| Dish, medium and oil | Provide a controlled microenvironment during handling. | Are identity, labelling, buffering, equilibration and time limits correct? |
| Camera or laser, if used | Supports documentation or validated zona opening and cell separation. | Has the accessory passed its own checks and is its use authorised? |
Step-by-Step Setup Readiness Sequence
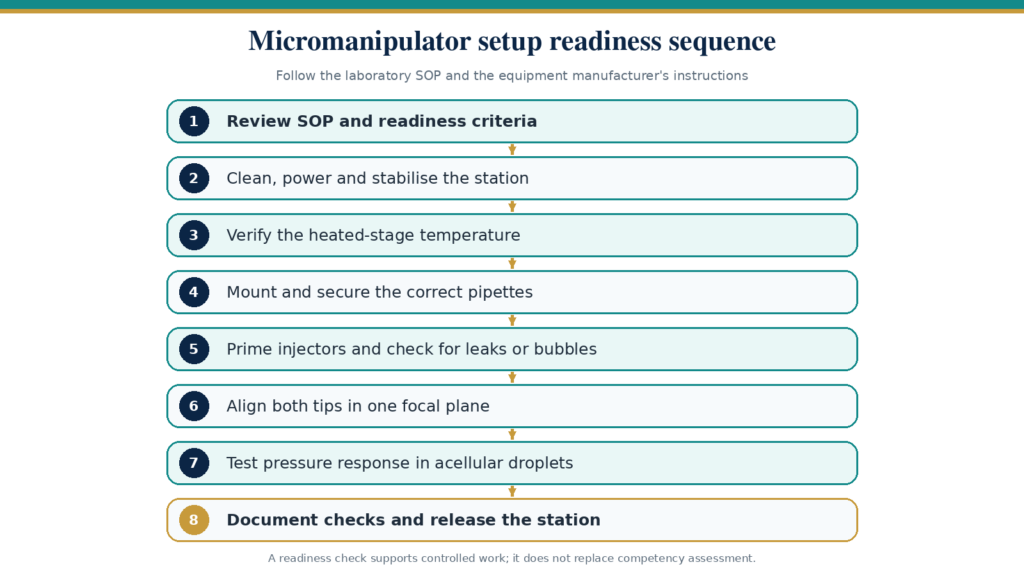
IMPORTANT: This sequence explains concepts, not device-specific operating instructions. A learner should work only under supervision using the local SOP and manufacturer guidance.
- Confirm authorisation and the SOP. Check the planned procedure, required witnessing, operator authorisation, equipment status and contingency pathway before touching the station.
- Prepare the work area. Use approved non-toxic cleaning methods, remove unnecessary items, stabilise the anti-vibration surface and power on equipment with sufficient warm-up time.
- Verify environmental controls. Confirm the heated-stage temperature at the validated dish position with a calibrated device. Use the approved buffered medium, oil overlay and exposure-time limits needed to control temperature, pH and osmolality.[1]
- Select and mount the pipettes. Choose intact, procedure-specific tools. Insert and secure them without contaminating or contacting the fine tips, and ensure each holder has safe clearance.
- Prime the microinjectors. Follow the device instructions for air or hydraulic systems. Establish continuous, responsive pressure transmission and investigate bubbles, leaks, lag or sudden movement before clinical use.
- Bring both tips into view. Use coarse movement first, then fine movement. Focus the holding and working tips without contacting the dish, objective or each other.
- Align and test function. Place both tips in the validated working plane and geometry. Test smooth holding, aspiration and expulsion in approved acellular droplets or other permitted training material; do not troubleshoot on patient material.
- Document and release. Record required checks, deviations and corrective actions. Release the station only when acceptance criteria are met; otherwise label it out of use and escalate.[1]
Factors That May Influence the Process
Reliable micromanipulation is multifactorial. A well-aligned pipette cannot compensate for an unstable stage, and a stable stage cannot compensate for untrained operation. ESHRE guidance emphasises controlled handling conditions, appropriate pipette sizing, minimised mechanical stress, traceability and documented competence.[1,2]
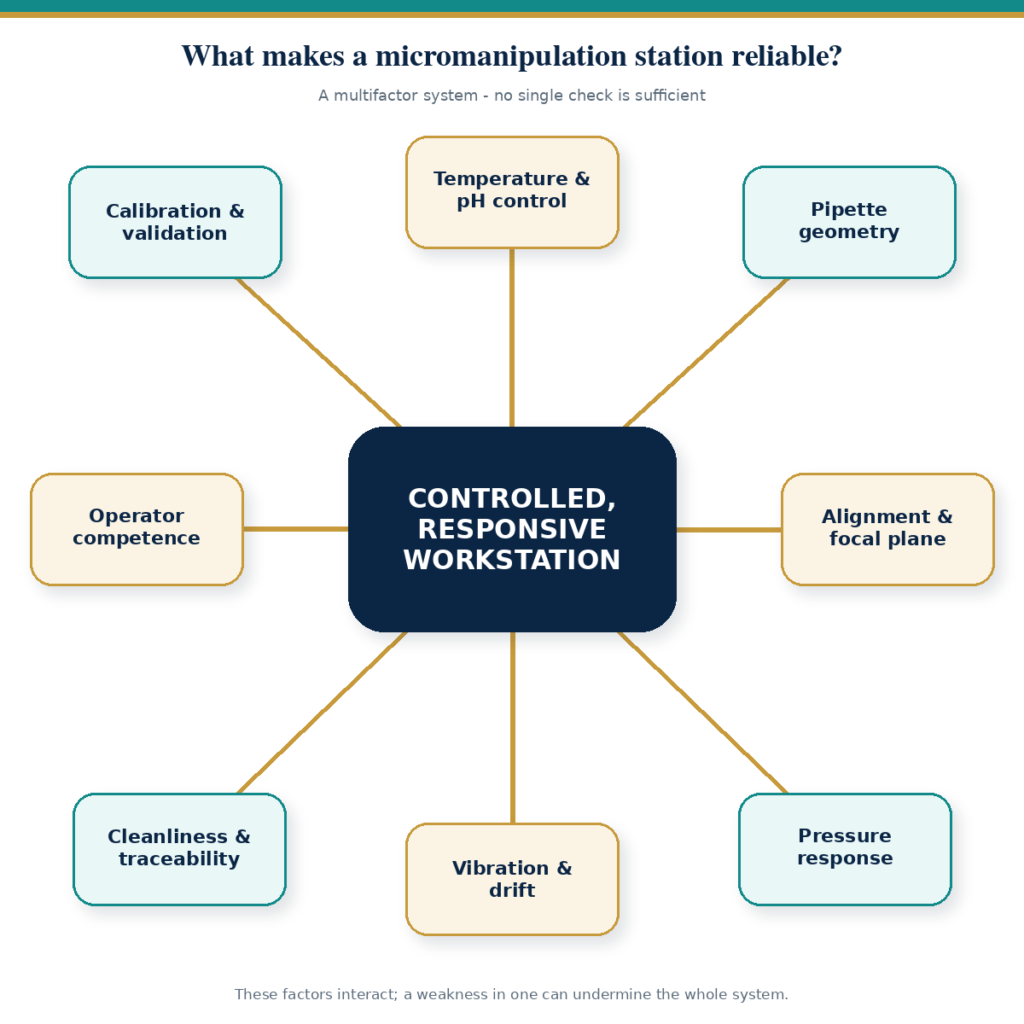
Table 2. Factors that can influence setup reliability and their control principles.
| Factor | Possible influence | Control principle |
| Temperature and pH | Altered cell physiology or unstable handling conditions. | Use validated media, stage settings, calibrated measurement and defined exposure limits. |
| Vibration and drift | Loss of fine positional control or unintended contact. | Use stable support, secure mounts and an escalation criterion for persistent movement. |
| Pressure and fluid continuity | Delayed, jerky or excessive aspiration and expulsion. | Prime and test the actual system; generic knob positions are not transferable. |
| Pipette geometry and alignment | Poor holding, unsuitable approach or unnecessary mechanical stress. | Use the correct tool and validated working angle, depth and focal plane. |
| People and traceability | Technique variability, misidentification or undocumented deviations. | Use trained staff, witnessing, competency review, logs and incident procedures. |
What a Setup Check Can Tell Us
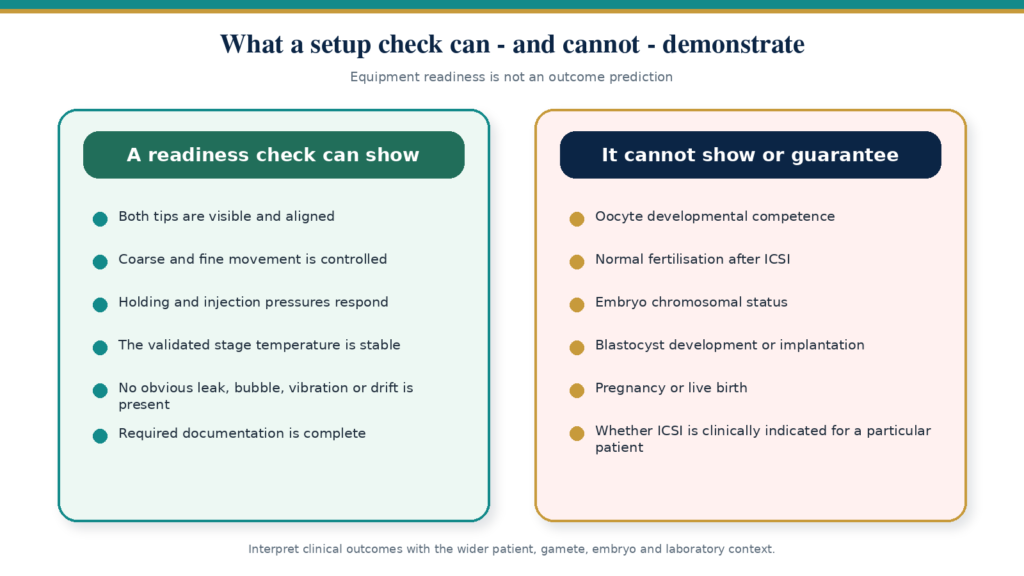
A readiness check can demonstrate that the tips are visible and aligned, movement is controlled, pressure response is usable, the stage is within its validated range, and no obvious leak, bubble, vibration or drift is present. It can also confirm that the required identity, maintenance and release documentation has been completed. These are technical observations about the station at a particular time, not measurements of reproductive potential.
What It Cannot Tell Us
Setup cannot reveal whether an oocyte is developmentally competent, whether fertilisation will be normal, whether an embryo is chromosomally suitable, or whether implantation, pregnancy or live birth will occur. It also cannot decide whether ICSI or biopsy is clinically indicated. Outcomes depend on interacting patient, gamete, embryo, procedural and laboratory factors, with uncertainty at each stage.[7,8]
Association, Prediction, Diagnosis and Guarantees
Association: describes a statistical relationship seen in groups; it does not by itself prove causation for an individual.
Prediction: estimates a probability using available information; it remains uncertain.
Diagnosis: is a clinical conclusion based on defined criteria and the wider assessment, not on workstation appearance.
Guarantee: means certainty. A micromanipulator setup cannot guarantee fertilisation, embryo development, pregnancy or live birth.
Myth versus Fact
Myth: A micromanipulator is simply an ICSI machine.
Fact: It is a modular workstation that may support ICSI, assisted hatching, biopsy and other authorised micromanipulation procedures.[3-5]
Myth: Once the tips are aligned, the station is ready for the whole day.
Fact: Movement, pipette replacement, pressure changes or an out-of-range reading may require rechecking. The local SOP sets frequency and triggers.
Myth: More holding suction always gives better control.
Fact: Excessive pressure can deform or stress a cell. Pressure must be responsive and proportionate to the tool, medium and procedure.
Myth: One injector setting works on every station.
Fact: Response depends on injector design, fluid or air path, tubing, pipette geometry and medium viscosity. Validated local settings matter.
Myth: A perfect setup guarantees normal fertilisation.
Fact: Setup supports technical consistency, while fertilisation also depends on sperm, oocyte and procedural biology. ICSI was developed to address specific fertilisation problems, not to remove all uncertainty.[6,7]
Myth: A laser is required for every micromanipulation procedure.
Fact: A validated laser may support assisted hatching or embryo biopsy, but it is not a universal requirement for all stations or procedures.[2]
Practical Interpretation for Learners
Use five questions: Is the station authorised? Is the environment within validated limits? Are both tips secure and aligned? Is pressure response smooth and predictable? Is the check documented? A ‘no’ or an uncertain answer means pause, protect the material and ask the responsible senior embryologist. Competence is demonstrated through supervised practice, direct observation and consistent performance, not by reading a setup guide alone.[1,2]
When Specialist Interpretation or Clinical Consultation Is Needed
Stop and escalate when a tip cannot be found or focused safely, alignment repeatedly drifts, pressure is delayed or erratic, bubbles or leaks persist, the stage is outside its accepted range, a pipette is damaged, an equipment alarm occurs, identity or witnessing is uncertain, or the biological response is unexpected. A laboratory director or senior embryologist interprets technical deviations; the treating clinician and team interpret patient-specific indications, risks and alternatives.
Summary
Micromanipulator setup prepares a coordinated microscope, manipulator, injector, heating, pipette and environmental system for controlled ART work. The safest beginner model is: verify authorisation, stabilise the environment, mount and prime the correct tools, align and test function, then document release. This supports consistency and quality assurance. It does not diagnose infertility, select treatment by itself or guarantee fertilisation, pregnancy or live birth.
Frequently Asked Questions
1. What is the difference between a micromanipulator and a microinjector?
The micromanipulator moves the pipette in three dimensions; the microinjector controls pressure and fluid movement through it.
2. Why is an inverted microscope used?
Its objectives view the dish from below, leaving working space above the stage for opposed pipettes and manipulators.
3. Is an air or oil injector better?
Neither design is universally superior. The appropriate system is the one validated for its intended use, maintained correctly and operated competently.
4. Can the same station be used for ICSI and embryo biopsy?
The core microscope and manipulators may be shared, but the pipettes, dish design, laser requirements, SOP, training and checks differ.
5. Can a beginner set up a station independently?
Observation and supervised practice are appropriate for learners. Independent release requires documented training, competency and local authorisation.
6. How often should setup be checked?
Follow the laboratory SOP. Checks commonly occur before use and after pipette changes, maintenance, movement, alarms or any unexpected behaviour.
7. Does a better setup increase the chance of pregnancy?
A controlled station may reduce avoidable technical variation, but pregnancy and live birth depend on many biological and clinical factors and cannot be guaranteed.
Beginner Glossary
ART: Assisted reproductive technology involving handling of oocytes or embryos outside the body.
ICSI: Intracytoplasmic sperm injection: placement of one selected sperm into an oocyte.
Inverted microscope: A microscope with objectives positioned below the stage.
Micromanipulator: A device that moves a micropipette precisely along three axes.
Microinjector: A pressure-control device used for holding, aspiration or expulsion.
Holding pipette: A blunt pipette that stabilises an oocyte or embryo with gentle negative pressure.
Injection pipette: A fine pipette used to carry and deliver a sperm during ICSI.
Biopsy pipette: A stage-specific pipette used to remove polar bodies or embryonic cells.
Heated stage: A controlled surface that helps maintain validated dish temperature.
Focal plane: The depth at which an object appears sharply focused.
Anti-vibration support: A table or pad that reduces transmitted movement.
Validation: Documented evidence that a process or item performs as intended.
SOP: Standard operating procedure: the approved laboratory instruction for a task.
Traceability: The ability to follow identity, materials, operators and events through the process.
References
1. ESHRE Good Practice in the IVF Lab Working Group, Arroyo G, Barrie A, et al. ESHRE recommendations on Good Practice in the IVF laboratory. Hum Reprod. 2026;41(8):1245-1269. doi:10.1093/humrep/deag096. Available online
2. ESHRE PGT Consortium and SIG-Embryology Biopsy Working Group, Kokkali G, Coticchio G, et al. ESHRE PGT Consortium and SIG Embryology good practice recommendations for polar body and embryo biopsy for PGT. Hum Reprod Open. 2020;2020(3):hoaa020. doi:10.1093/hropen/hoaa020. Available online
3. Zegers-Hochschild F, Dyer S, Adamson GD, et al. The International Glossary on Infertility and Fertility Care, 2025. Hum Reprod. 2026;41(6):892-909. doi:10.1093/humrep/deag029. Available online
4. Fleming SD. Micromanipulation, micro-injection microscopes and systems for ICSI. In: Palermo GD, Nagy ZP, editors. Manual of Intracytoplasmic Sperm Injection in Human Assisted Reproduction. Cambridge: Cambridge University Press; 2021. p. 114-128. doi:10.1017/9781108887595.013. Available online
5. Malter HE. Micromanipulation in assisted reproductive technology. Reprod Biomed Online. 2016;32(4):339-347. doi:10.1016/j.rbmo.2016.01.012. Available online
6. Palermo G, Joris H, Devroey P, Van Steirteghem AC. Pregnancies after intracytoplasmic injection of single spermatozoon into an oocyte. Lancet. 1992;340(8810):17-18. doi:10.1016/0140-6736(92)92425-F. Available online
7. Practice Committee of the American Society for Reproductive Medicine. Intracytoplasmic sperm injection for nonmale factor indications: a committee opinion. Fertil Steril. 2026;126:49-56. Available online
8. ESHRE Special Interest Group of Embryology and Alpha Scientists in Reproductive Medicine. The Vienna consensus: report of an expert meeting on the development of ART laboratory performance indicators. Hum Reprod Open. 2017;2017(2):hox011. doi:10.1093/hropen/hox011. Available online
9. World Health Organization. WHO laboratory manual for the examination and processing of human semen. 6th ed. Geneva: World Health Organization; 2021. ISBN 978-92-4-003078-7. Available online
10. Elder K, Van den Bergh M, Woodward B. Troubleshooting ICSI procedures. In: Troubleshooting and Problem-Solving in the IVF Laboratory. Cambridge: Cambridge University Press; 2015. p. 171-188. doi:10.1017/CBO9781107294295.012. Available online
11. Ross C. Intracytoplasmic sperm injection (ICSI). In: Coward K, Wells D, editors. Textbook of Clinical Embryology. Cambridge: Cambridge University Press; 2013. p. 262-274. doi:10.1017/CBO9781139192736.028. Available online
Final Educational Disclaimer
FINAL DISCLAIMER: This resource provides general scientific education and does not replace patient-specific assessment, informed consent, professional judgement, a validated laboratory SOP, equipment instructions, regulatory requirements or supervised competency training. ART procedures and outcomes vary, and no laboratory setup can guarantee fertilisation, pregnancy or live birth.